

Hi, this is Anika Lacerte of The Handcrafted Story. I make things to inspire your creativity and storytelling. I’ve been drawing with the iPad Pro daily since April 2017. You can find my drawings and time-lapse videos on Instagram @thehandcraftedstory.
Reasons Why I Like Art Journaling with the Procreate App
- Takes up minimal space
- Easy to travel with
- No mess to clean up
- No drying time
- Easy to use in short time periods
- Easy to share good photos of your art online
Challenges of Art Journaling with the Procreate App
- Initial cost of the iPad Pro and Apple Pencil
- Missing the tactile feel and sound of paint and other media
- More challenging to add ephemera, although you could scan and insert them
SUPPLIES
The Procreate app is only available for iPad. At the time of writing this, the Procreate app costs $9.99 US or $13.99 in Canada.
I use an 9.7″ iPad Pro* with an Apple Pencil*. You don’t need the pro version to use the Procreate app but you do need the pro version to use the Apple Pencil.
* these are affiliate links
PROCESS
When I first started using the Procreate app, it took me awhile to figure out how to use it. This is the basic tutorial I wish I could have watched when I started. So if you’re new to the Procreate app, this video is for you!
Gestures
- Undo – two-finger tap (or tap the arrow icon, pointing left). Make sure your fingers are separate enough that the app can detect there are two fingers instead of one.
- Redo – three finger tap (or tap the arrow icon, pointing right). Make sure your fingers are separate enough that the app can detect there are three fingers instead of one.
- Zoom/Rotate – “pinch the screen” in and out with two fingers. You can zoom in and out and rotate at the same time.
- Reset to full screen – pinch the screen and pull up and off the screen.
- Cut/Copy/Paste – three finger swipe down (or tap on the Actions menu (wrench icon), then Image, then choose Cut or Copy)
- Draw a straight line – draw a line and pause at the end until the line straightens. To make it a perpendicular line, while still pausing, use your other hand to tap two fingers anywhere on the screen and the line will snap to specific angles including perfectly horizontal and vertical.
Gallery
- Open a new canvas – in the Gallery (This is the screen you seen when you open the Procreate app. It will say “Procreate” in the top left corner), tap on the plus sign in the top right corner and choose your canvas size. I tend to use the Square 2048 x 2048px canvas size since it works well for posting to Instagram.
- Rename an artwork – in the Gallery, tap on the artwork name you want to change. Type in the new name and tap Done.
- Duplicate an artwork – in the Gallery, swipe left on the artwork you want to duplicate. Then tap on the Duplicate button.
- Delete an artwork – in the Gallery, swipe left on the artwork you want to delete. Then tap the red Delete button.
- Move files in the gallery – tap and hold on the image you want to move, (don’t let go until you place it in the exact place you want it), drag it to the “stack” or folder where you want to move it. The stack will flash blue and open (but don’t lift up your pencil yet!), now pick a place to leave your image and then let go.
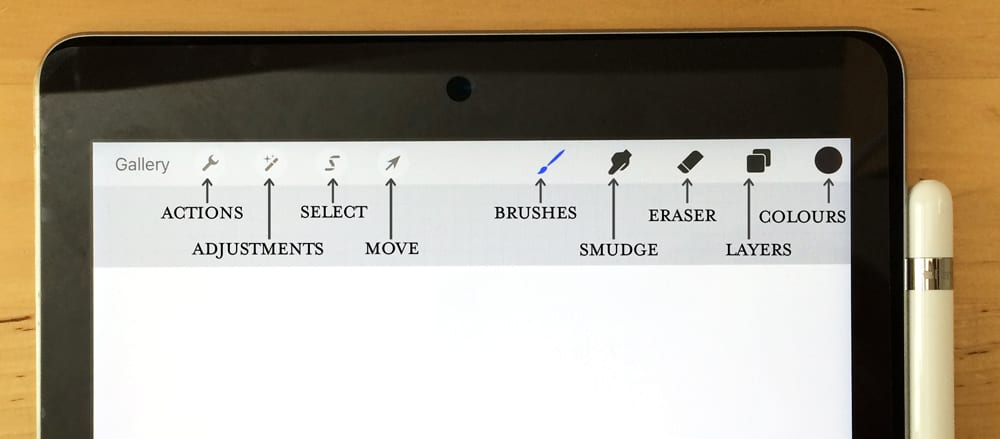
Action Menu (wrench icon)
- Insert a photo – Tap on the Actions menu (wrench icon), then Image, then Insert a photo. I like to use a photo of a blank page in a sketchbook in a layer in the Procreate app, and make new layers on top of the photo to draw on. So it looks like I’m drawing in a sketchbook.
- Cut/Copy/Paste – if you prefer not to use the gesture (three finger swipe down), you can still access the options to cut, copy and paste under the Actions menu > Image.
- Save a file to share – Tap on the Actions menu (wrench icon), then Share, then tap on your preferred file format (to share your image on Instagram, choose JPEG, PNG or TIFF).
- Watch your time-lapse video – Tap on the Actions menu (wrench icon), then Video, then Time-lapse Replay.
- Create a time-lapse video – Tap on the Actions menu (wrench icon), then Video, then Export Time-lapse video, then Save Video.
Select Button (S icon) / Move Button (Arrow icon)
Select and move – tap the Select menu at the top (the icon that looks like a letter S), draw around the object you want to select. When you are done drawing around the object, tap on the arrow icon next to the Select menu. If you want to move it to a different location, tap and drag outside the box (do NOT tap inside the selected box). If you want to put it on a different layer, drag three fingers downd and choose Cut + Paste.
Brushes
- Choose a brush – tap on the Brushes menu and tap on the brush you want to use. Then tap anywhere outside the Brush menu to close the menu and start using the brush.
- Change the size of the brush – You can change the size of the brush by using the scroll bar, which will either be on the left or right side of the screen.
- Change the opacity of the brush – You can also change the opacity of the brush by using the scroll bar below the brush size scroll bar.
- Change the colour of the brush – Tap on the Colour menu (top right). I usually use the Classic setting (at the bottom of the Colour menu). Or I scroll through the colour palettes I’ve created by tapping on the Palettes setting at the bottom of the Colour menu.
- Modify a brush – First make a duplicate of the brush you want to modify. With the Brushes menu open, swipe left on the brush you want to modify, then tap Duplicate. Make your changes on the new brush that has a wavy line at the top right corner.
- Install a brush – Tap on the Brushes menu (brush icon), then tap on the plus sign at the top right of that menu, then Import. I don’t have much experience installing brushes.
- Make a grid – Tap on the Brush menu, then Textures, then Grid. I like to use the grid as a temporary layer to help me draw using a grid background. So I make a new layer and draw a grid. Then when I’m done using the grid, I hide the grid by unchecking the box next to that layer in the Layers menu. You can lower the opacity of the grid by tapping on the grid layer with two fingers and then swiping left to lower the opacity.
Smudge
I don’t use this option, so I don’t have any tips to add. But you can use any of the brushes to smudge your artwork
Eraser
I use the eraser tool often. You can use any brush to erase your artwork. So you can erase with the same brush you are drawing with, or you can erase with a different brush. You can change the size of the brush you’re erasing with by using the scroll bar, which will either be on the left or right side of the screen. You can also change the opacity of the brush you’re erasing with, which is the scroll bar below the brush size scroll bar.
Layers Menu
- Make a new layer – tap on the Layers menu (icon second from the right, it looks like two boxes stacked). Then tap on the plus sign at the right of that menu. A new layer should appear. Layers make it easy to make changes to portions of your drawing without having to redo the entire drawing. It makes it pretty quick to change the colour or opacity of some elements instead of affecting all the elements. I like making layers when I’m adding a lot of detail, especially if I’m not sure I’m going to like what I’m adding. Then I can hide the layer I added to see what parts I like and what I want to leave out. I also use layers to improve on my drawing, especially lettering. So I might do a fairly quick lettering layer so I can try out the spacing, then lower the opacity so I can still see it underneath. Then add a new layer and draw on that.
- Move layers – in the Layers menu, tap and hold on the layer you want to move and drag it to a new order.
- Group layers – tap on the Layers menu (icon second from the right, it looks like two boxes stacked). Then tap on one of the layers you want to include in the group. Let go and swipe right on all the other layers you want to include in the group. The layers you swipe right on will be a lighter blue. When you have selected all the layers you want to include in the group, tap on the icon at the top right of the Layers menu, it looks like three horizontal lines.
- Rename a layer or group – tap on the layer or New Group. Then tap on Rename. If you don’t see the option to Rename when you tap on it, try tapping again.
- Change layer opacity – in the Layers menu, tap with two fingers on the layer you want to change opacity. The Layers menu should close and you can slide your finger or pen anywhere on the screen left to right to adjust the opacity. You should see the opacity near the top of the screen.
- Alpha channel – in the Layers menu, use two fingers to swipe right. A checkerboard pattern should be now visible behind the image in the Layers menu. Now you can use the brush to affect only what you have drawn on that layer. I like to change the colour that way, so with the alpha channel turned on, I make my brush as large as it can go and choose the new colour and draw all over the image. To turn the alpha channel OFF, go back to the Layers menu and use two fingers to swipe right again. The checkerboard pattern should disappear.
Colour
- Fill in a shape with a colour – Tap and hold on the circle of colour in the top right of the screen, then drag into whichever shape you want filled with that colour. The shape must have no gaps or the colour will fill the screen instead of just that shape.
- Choose a colour from an inserted photo – Tap on the square in the palette where inbetween the size of brush and opacity of brush. A double circle will appear somewhere on the screen, which you can drag around until you find the colour you want.
ACTION STEPS
After you have downloaded the Procreate App, make a goal to draw with it daily for a month. The point with this regular practice is not to make beautiful drawings but to get to know the app better.
- Set a timer for five or ten minutes.
- Pick a time of day when you aren’t too tired.
- Make a list of things you want to draw, like a list of flowers or different words or quotes.
- You could even use a drawing book to copy from to give you experience using the app.
Like with many new tools, there is a learning curve to using the Procreate app but it is worth it! Have patience with yourself and persevere. You can learn more about the Procreate app at https://procreate.art/.
